使用 mocha 和 chai 进行基于浏览器的 javascript 异步测试
- 前端开发
- 2016-07-25
- 9468热度
- 0评论
基于 BDD (行为驱动开发) 的 UI 相关的功能性测试,特别是涉及到与后端数据交互的情况下,需要浏览器环境和对 ajax 的支持,对于涉及动画的交互,还需要延时执行测试代码。这里提到了几个基本要求:
- 浏览器环境支持(DOM/DOM JavaScript API/CSSDOM 等)
- ajax 支持
- 异步测试支持
下面针对这样的诉求,介绍使用 mocha、chai 和 PhantomJS 方案的相关测试工具/库的安装与测试环境的构建。
1. 相关测试工具/库简介
1.1 mocha
mocha 是近年来非常流行的 JavaScript 测试框架。它 支持浏览器环境,并且支持异步测试(done 回调或 Promise),参考如下:
http://mochajs.org/#running-mocha-in-the-browser
http://mochajs.org/#asynchronous-code
1.2 chai
chai 是一个常常被拿来与 mocha 一起使用的断言库,提供了丰富的断言接口,可以对各种结果进行断言。
http://chaijs.com/api/
1.3 PhantomJS
PhantomJS 提供了一个基于 WebKit 内核的无界面的浏览器运行环境,使用它提供的 API,可以通过 JavaScript 自动化的实现基于浏览器的各种操作。于是基于它的 API,进行无界面的自动化测试也相应变的简单。
http://phantomjs.org/
http://phantomjs.org/headless-testing.html
1.4 mocha-phantomjs
mocha-phantomjs 是一个 通过 PhantomJS 执行 mocha 浏览器环境测试的工具库。它使用 PhantomJS 的浏览器环境,通过事件监听的方式检测 mocha 测试的执行过程。
https://github.com/nathanboktae/mocha-phantomjs
mocha-phantomjs-core
mocha-phantomjs-core 是 mocha-phantomjs的核心依赖库。作者将它单独提取出来,是因为它也可以支持 SlimerJS。
SlimerJS 是基于的 Gecko 内核(Firefox)的与 PhantomJS 的 API 几乎相同的工具,而且SlimerJS在执行过程中默认会启动有界面的浏览器窗体,可以看到整个执行过程。
https://github.com/nathanboktae/mocha-phantomjs-core
http://www.slimerjs.org/
2. 测试环境构建
这里我们采用 mocha 作为测试框架,使用 chai 的 Expect 断言风格 API,使用 mocha-phantomjs 模拟浏览器和 ajax 环境。
2.1 工具库安装
进入到项目目录下,执行命令:
npm i mocha chai mocha-phantomjs-core mocha-phantomjs --save-dev
2.2 创建测试目录
新建 test 目录作为测试目录,参考 mocha 的浏览器环境示例,在测试目录下新建 index.html 文件作为测试入口。index 文件内容参考:
<!DOCTYPE html>
<html lang="zh-cn">
<head>
    <meta charset="utf-8">
    <title>mocha-chai-test</title>
    <link id="bscss" href="../node_modules/bootstrap/dist/css/bootstrap.min.css" rel="stylesheet">
    <link href="../node_modules/mocha/mocha.css" rel="stylesheet">
</head>
<body>
    <div id="mocha"></div>
    <div class="container">
        <div class="row">
            <div class="col-lg-2">
                <div class="input-group">
                    <input type="text" class="form-control" id="test">
                    <div class="input-group-btn">
                        <button type="button" class="btn btn-default dropdown-toggle" data-toggle="dropdown">
                            <span class="caret"></span>
                        </button>
                        <ul class="dropdown-menu dropdown-menu-right" role="menu">
                        </ul>
                    </div>
                </div>
            </div>
        </div>
    </div>
</body>
<script src="../node_modules/jquery/dist/jquery.min.js"></script>
<script src="../node_modules/bootstrap/dist/js/bootstrap.min.js"></script>
<script src="../node_modules/mocha/mocha.js"></script>
<script src="../node_modules/chai/chai.js"></script>
<!-- 测试文件引入 -->
<script src="../src/bootstrap-suggest.js"></script>
<script src="helper/setup.js"></script>
<script src="test.js"></script>
<script src="helper/run.js"></script>
</html>
3. 异步测试代码的编写
mocha 是单线程顺序执行测试的,这对于不相关的多模块测试来说,可能会使得测试时间过长(这种情况下是可以并发执行的,可参考 ava)。但是它的每一步测试都要等待前一个测试执行结束,这也使得异步测试可以方便地顺序书写。
在测试目录下新建测试文件,和书写浏览器环境中的功能代码类似的,书写测试代码,并在 index.html 中引入。
我们新建 test.js 作为示例,主要介绍如何书写异步的测试。
为了简单,这里没有使用任何模块化和需要构建的内容。
为了方便的异步测试书写,采用了 jQuery 的 $.Deferred 异步解决方案。当然,你完全可以使用 ES6/ES7 的 Promise、Generator,然后使用 babel 进行编译。
首先初始化(setup.js):
window.mocha.setup({
    ui: 'bdd',
    timeout: 30000 //异步测试时间一般较长,根据实际测试情况适当设置超时时间
});

window.expect = window.chai.expect;

/**
 * 执行异步的验证,返回 deferred 对象以便于持续的执行
 * @param  {Function} callback 要异步执行的方法
 * @param  {Number}   timeout  超时时间,超时则直接 resolve
 * @param  {Function} done     mocha 异步 done
 * @return {Deferred}
 */
window.lintAsync = function(callback, timeout, done) {
    timeout = timeout || 300;
    var $d = $.Deferred();

    try {
        var $p = callback($d);
        done && $p.then && $p.then(done);
    } catch (err) {
        done && done(err);
    }

    setTimeout(function() {
        $d.resolve();
    }, timeout);

    return $d;
}
然后编写异步测试代码(test.js),示例:
var $input = $('#test');
var $dropdown = $input.next().find('ul');
var lintAsync = window.lintAsync;

describe('测试(首次从 URL 获取数据)', function() {
    var param = {
        url: "data.json",  //test 目录下存放该 api 数据文件
        idField: "userId",
        keyField: "userName"
    };

    //采用 done 回调的方式支持异步执行
    it('基本初始化,数据请求成功测试', function(done) {
        lintAsync(function($d) {
            $input.bsSuggest(param).on('onDataRequestSuccess', function(e, result) {
                expect(result).to.have.property('value').with.length(31);
                $d.resolve();
                done();
            });
        });
    });

    describe('各种输入操作模拟', function() {
        it('触发 keyup/keydown 事件', function() {
            //返回为有 thenable 支持的 Promise 对象,也可以支持异步执行
            return lintAsync(function() {
                  $input.trigger('keyup').trigger('keydown');
              })
            .then(function() {
                expect($dropdown.is(':visible')).to.be.true;
                expect($dropdown.find('tr').length).to.be.ok;
            });
        });

        //todo more test...
    });
});
最后,执行测试:
mocha.checkLeaks();
mocha.globals(['jQuery']);
mocha.run();
以上的示例可参考 bootstrap-suggest-plugin 项目的测试。
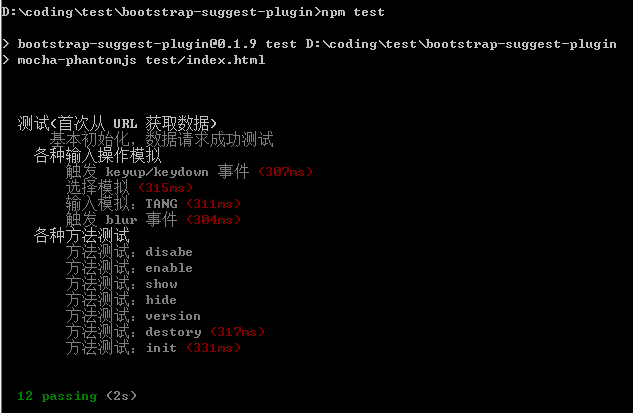
4. 测试的执行
4.1 使用 mocha-phantomjs
使用 mocha-phantomjs 执行。执行命令:
.\node_modules\.bin\mocha-phantomjs test/index.html -R dot 命令行中即会返回测试的结果。
4.2 使用 mocha-phantomjs-core
参考 mocha-phantomjs-core 的文档说明,也可以以如下方式执行测试:
.\node_modules\.bin\phantomjs .\node_modules\mocha-phantomjs-core\mocha-phantomjs-core.js test/index.html使用 SlimerJS 执行测试:
.\node_modules\.bin\slimerjs .\node_modules\mocha-phantomjs-core\mocha-phantomjs-core.js test/index.html
更多的参数参考:
https://github.com/nathanboktae/mocha-phantomjs
https://github.com/nathanboktae/mocha-phantomjs-core
4.3 使用浏览器
通过浏览器直接打开 test/index.html,也可以看到测试执行的情况。由于涉及到 ajax 请求,应当在 webServer 下打开页面。
浏览器中的示例: http://lzw.me/pages/demo/bootstrap-suggest-plugin/test/
5. 其他的说明
关于 mocha 的执行顺序
在 describe 下的 it 会优先于同级别的 describe 内的 it 执行,这点应当注意。
关于 ajax 相关的测试
由于网络环境的复杂性,如无必要的复杂数据请求测试,可自行挂在 mock 方法。
- API 较少的情况下,提供对应 API 的文件。这是最简单的方式。
- 简单 mock。例如重写全局 ajax/fetch 方法,以 jQuery 为例:
function mockAjaxSimple(options) {
    //todo..
}
$.ajax = function(options) {
   return $.Deferred().resolve(mockAjaxSimple(options));
};
- 复杂的 mock。采用各种 mock 插件。例如 jquery.mockjax
基于 ES6+ 的测试
由于是基于浏览器的测试,
使用 webpack 或其他模块化构建工具编译为 ES5 的代码输出,然后对输出后的页面作测试即可。测试代码也可以使用 ES6/ES7 语法,然后使用 babel 编译。
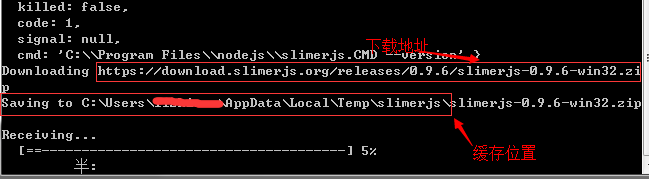
关于 PhantomJS 和 SlimerJS 的 CDN 安装
对于 PhantomJS 的依赖安装,如下载超时,可先执行如下命令:
export PHANTOMJS_CDNURL=https://npm.taobao.org/dist/phantomjs
npm i phantomjs
windows 下执行:
set PHANTOMJS_CDNURL=https://npm.taobao.org/dist/phantomjs
npm i phantomjs
对于 SlimerJS 的安装,存在同样的问题,可如下命令后再执行安装:
set PHANTOMJS_CDNURL=https://download.slimerjs.org/releases
npm i slimerjs
在 CDN 也搞不定的情况下,另外还有一种变通的安装方式。通过命令行提示,使用迅雷等 P2P 工具下载对应的 zip 包,解压到命令行提示中下载的目录,解压,重命名解压目录为对应提示的临时名称(视实际情况操作)。然后重新执行安装命令即可顺利安装。
6. 相关参考
http://mochajs.org
http://chaijs.com/api/bdd/
https://github.com/nathanboktae/mocha-phantomjs
https://github.com/nathanboktae/mocha-phantomjs-core
http://phantomjs.org/headless-testing.html
http://www.slimerjs.org/


