Electron 自编译应用崩溃(crash)调试分析方法
- 前端开发
- 2021-04-19
- 9051热度
- 2评论
1. Electron 中的应用崩溃(crash)
如果仅是 Javascript 引起的异常,可以在应用逻辑中监听相关 Error 类型的事件并进行处理。通过在监听 crashed 相关事件,可以在应用内监听到应用崩溃并给出响应:
app.on('gpu-process-crashed', (_event, killed) => {});
app.on('renderer-process-crashed', (_e, _w, killed) => {});
mainWindow.webContents.on('plugin-crashed', (_ev, name, version) => {});
mainWindow.webContents.on('crashed', (ev, killed) => {});
以上代码只能监听并处理 crashed 事件,但无法得知到底是什么原因导致的 crash。如需分析具体细节,则需要获取崩溃产生的 minidump 文件并进行调试分析。
2. Electron 中的应用崩溃文件
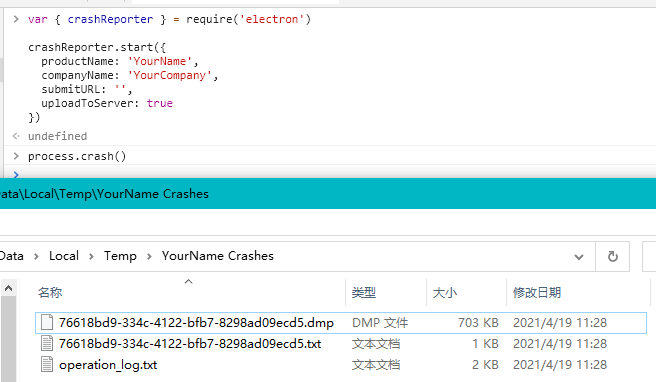
只有在 Electron 应用中执行了 crashReporter.start,才会生成 crash 相关的目录及文件信息。以下为参考官方文档的示例代码:
const { crashReporter } = require('electron');

crashReporter.start({
  productName: 'YourName',
  companyName: 'YourCompany',
  submitURL: 'https://your-domain.com/url-to-submit',
  uploadToServer: true
});
制造一个 crash:
process.crash();
查找崩溃文件:
const app = require('electron').remote.app;

// 对于支持 crashDumps 的版本,获取崩溃文件路径
app.getPath('crashDumps');

// 不支持 getPath('crashDumps') 的 Electron 版本
// 从 temp 目录下查找 <productName>-Crashes 目录
app.getPath('temp');
通过实际的测试以上代码,在 electron@5.x 版本下,在临时目录下找到了崩溃的文件,其后缀为 .dmp。如图所示:
3. Electron 崩溃文件分析
3.1 什么是应用程序符号文件(Symbols)
上文得到的 .dmp 文件为 minidump 文件,它是微软制定的崩溃转存储技术格式的文件,minidump 文件只包括了最必要的信息,用于恢复故障进程的所有线程的调用堆栈,以及查看故障时刻局部变量的值。
要具体分析 minidump 文件,则需用到 Electron 应用程序的 symbols 符号文件。
应用程序 symbols 符号文件类似于前端中的 sourceMap 文件,调试工具可以根据它将 dump 文件中的崩溃信息与原始代码进行映射解析。不同平台下的符号文件格式不同,windows 平台的应用一般为 .pdb 格式。
Google breakpad 是一个跨平台的崩溃转储和分析框架和工具集合,它提供的工具支持将所有平台下的崩溃文件转换为 Breakpad 定义的 Symobol 格式。Symobol 格式非常简单,它其实是一种纯文本文件,每一行一条记录,每条记录中的字段以一个空格作为分隔符,每条记录的第一个字段表示这一行是什么类型的记录。
如果使用的是 Electron 官方构建的包,可以从 github 上下载到对应版本的 symbols 文件:
如果是自编应用,则会在可执行文件输出目录下输出同名的符号文件。如 electron.exe -> electron.exe.pdb。
3.2 使用 Windbg 调试 Electron
对于 minidump 文件,在 windows 下可以使用 Windbg 分析。它包含在 windows SDK 中,你可以直接安装 windows 10 SDK。
一个简要的步骤大致如下(更详细的方式请查阅官方文档):
- 安装
windows 10 SDK - 搜索
Windbg并打开 - 按
ctrl+E快捷键并选择electron.exe应用程序文件 - 在底部执行
.reload /f /i electron.exe加载它。此时会查找其对应的符号文件,若未找到会报错。可将其对应符号文件放置到报错信息中查找路径的任一目录下,再重新执行 - 按
ctrl+s快捷键可以选择minidump文件加载 - 根据加载情况进行分析即可
相关参考:
- https://docs.microsoft.com/zh-cn/windows-hardware/drivers/debugger/debugger-download-tools
- https://developer.microsoft.com/zh-cn/windows/downloads/windows-10-sdk/
- https://docs.microsoft.com/zh-cn/windows-hardware/drivers/debugger/getting-started-with-windows-debugging
- LSP异常导致Electron启动不了问题分析
3.3 使用 Sentry 平台分析
Electron 提供了通过 Sentry 官方提供的 @sentry-cli 和 @sentry/electron 工具包,通过安装并配置它们,可在 Electron 应用中集成 Sentry,它可以帮助收集并分析 crash 文件。
3.3.1 安装与集成 Sentry
安装 @sentry/electron:
yarn add -D @sentry/cli
yarn add @sentry/electron
在 Electron 应用集成 Sentry:
// 用于main 主进程应用中
import { init } from '@sentry/electron/dist/main';
// 用于浏览器渲染进程中
import { init } from '@sentry/electron/dist/renderer';

init({
  dsn: 'https://examplePublicKey@o0.ingest.sentry.io/0',
  debug: process.env.APP_ENV !== 'prod',
  environment: process.env.APP_ENV,
  release: 'release@' + pkg.version,
  beforeSend: data => {
    const exception = data.exception;
    if (exception && exception.values) {
      // TODO,可以做一些修正累的处理等
    }
    return data;
  },
});
3.3.2 配置符号文件的下载与 Sentry 上传
npm install -g @sentry/wizard
# 登陆 Sentry 并获取相关项目配置信息
sentry-wizard --integration electron --url "https://mysentry.lzw.me"
# or 手动填写相关项目配置信息
sentry-wizard --integration electron --skip-connect
按照提示操作,完成后会生成一个 sentry-symbols.js 文件,每次 Electron 版本升级更新后都执行一下它,即可从 Electron Github Release 地址下载对应的符号文件并上传到你所配置的 Sentry 服务器。
更为具体的信息可参考其官方文档:
- https://docs.sentry.io/platforms/javascript/guides/electron/
- https://www.npmjs.com/package/@sentry/wizard
3.3.3 JavaScript 文件的 SourceMap 上传至 Sentry
在 webpack 中集成,上传 SourceMap 至 Sentry 服务器:
yarn add -D @sentry/webpack-plugin
webpack 中配置该插件:
const SentryWebpackPlugin = require("@sentry/webpack-plugin");

module.exports = {
  // other configuration
  configureWebpack: {
    plugins: [
      new SentryWebpackPlugin({
        // sentry-cli configuration
        authToken: process.env.SENTRY_AUTH_TOKEN,
        org: "example-org",
        project: "example-project",
        release: process.env.SENTRY_RELEASE,

        // webpack specific configuration
        include: ".",
        ignore: ["node_modules", "webpack.config.js"],
      }),
    ],
  },
};
此外,也可以使用 @sentry/cli 上传 SourceMap,可官方文档参考:
- https://docs.sentry.io/product/cli/releases/#sentry-cli-sourcemaps
3.4 自编 Electron 的 symbols 符号文件
如果是修改了 Electron 源码后的自编应用,在构建输出目录中的 .pdb 类型的文件即是 symbols 符号文件,如 electron.exe.pdb 等。关于 Electron 源码自编可参考如下文章:
Sentry 平台支持 Breakpad 格式的符号文件。另外,Sentry 平台也支持 Native 方式的 pdb 文件,但不支持 .NET 平台下生成的 pdb 文件。
我们可以通过使用 dump_syms.exe 工具将 pdb 格式的符号文件转换为 Breakpad 格式。dump_syms.exe 文件在 Electron 编译目录的如下路径 third_party\breakpad\breakpad\src\tools\windows\binaries\dump_syms.exe。以下地址也可以下载到它:
- https://github.com/electron/chromium-breakpad/blob/master/dump_syms.exe
- https://gitee.com/lzw/breakpad-minindump-tools/blob/master/tools/dump_syms.exe
使用 dump_syms.exe 工具生成 electron.exe.sym 文件示例:
..\..\third_party\breakpad\breakpad\src\tools\windows\binaries\dump_syms.exe out\Release\electron.exe > electron.exe.sym
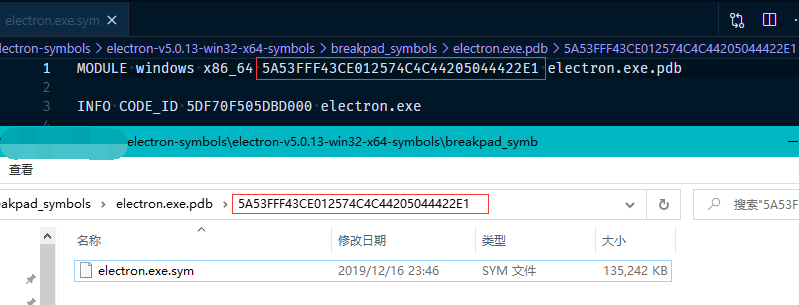
打开 electron.exe.sym 文件来看一下。其实就是一个类似 SourceMap 的文本文件,包含原始文件名及变量、函数、方法等的映射关系。其中第一行包含了系统平台、 Breakpadid 以及对应的 pdb 文件名。

3.5 自编 Electron 符号文件的 Sentry 上传
从 Electron 官方下载得到的符号文件包含如下信息,我们对照该文件包生成相同格式的包并提供给 Sentry 上传即可。其中 electron.exe.pbd 路径后的一段为 Breakpadid,从符号文件的第一行可取得。
其实 sentry-symbols.js 文件中的主要逻辑就是根据当前安装的 Electron 版本,下载对应的符号文件,并使用 @sentry/cli 进行上传。我们也可以写一个类似的上传脚本。示例:
我们参考从官网下载得到的 electron-<version>-win32-x64-symbols.zip 文件为例,在本地生成并压缩一个同样结构的 zip 文件,放到 .electron-symbols/custom 目录。
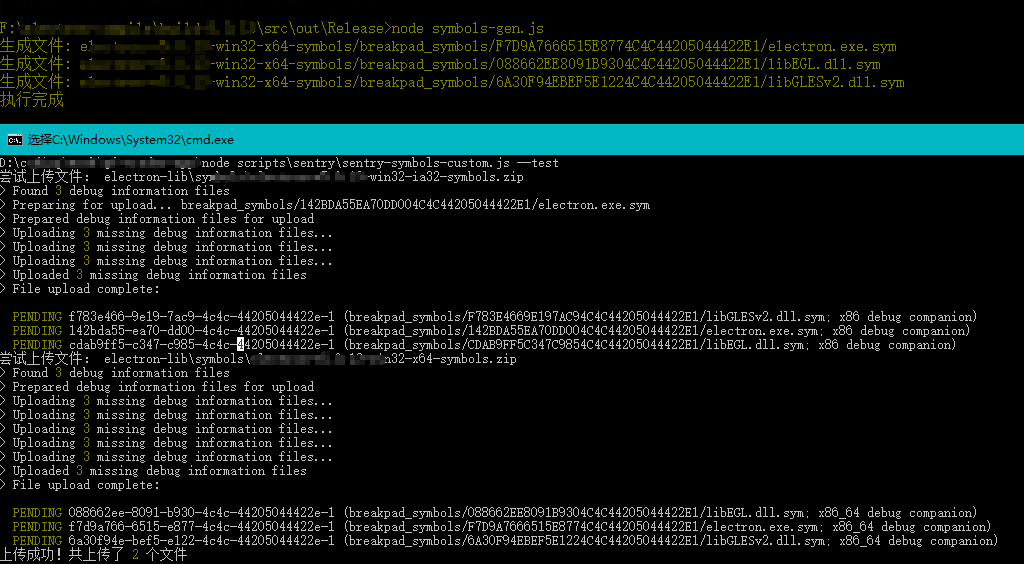
从 Electron 编译输出目录生成 Symbols 符号文件,主要示例:
const path = require('path');
const fs = require('fs');
const { execSync } = require('child_process');
const getArgv = ()  => {
    return process.argv.slice(2).map(d => d.replace(/^--/, '')).reduce((res, d) => {
        if (d.includes('=')) {
            const [key, value] = d.split('=');
            res[key] = value;
        } else res[d] = true;
        return res;
    }, {});
};
const argv = getArgv();

function genSym() {
    const version = argv.version || '5.0.13';
    const outDirBase = 'electron-v${version}-win32-' + (argv.ia32 ? 'ia32' : 'x64') + '-symbols';
    const dumpSyms = path.resolve('../../third_party/breakpad/breakpad/src/tools/windows/binaries/dump_syms.exe');

    if (!fs.existsSync(dumpSyms)) {
        console.log('未找到 dump_syms.exe 文件,请将当前文件放置到构建输出目录中,如 out/Release 下。');
        console.log('NotFound dumpSymsPath:', dumpSyms);
    } else {
        if (!fs.existsSync(outDirBase)) fs.mkdirSync(outDirBase, {recursive: true});
        fs.writeFileSync(path.join(outDirBase, 'version'), version);

        ['electron.exe', 'libEGL.dll', 'libGLESv2.dll'].forEach(filename => {
            if (!fs.existsSync(filename)) return console.error('未发现文件:', filename);

            const outFilename = filename + '.sym';
            execSync(dumpSyms + ' ' + filename + ' > ' + outFilename);

            if (fs.existsSync(outFilename)) {
                const outFileContent = fs.readFileSync(outFilename, 'utf8');
                const firstLine = outFileContent.split('/n')[0].split(' ');
                const breakpadid = firstLine[3];

                if (!breakpadid) return console.log('sym 文件读取错误:', firstLine);

                const outFilePath = outDirBase + '/breakpad_symbols/' + breakpadid + '/' + outFilename;
                if (!fs.existsSync(path.dirname(outFilePath))) fs.mkdirSync(path.dirname(outFilePath), {recursive: true});
                fs.writeFileSync(outFilePath, outFileContent);
                console.log('生成文件:', outFilePath);
            } else {
                console.log('可能生成失败了,未发现生成的文件:', filename, '=>', outFilename);
            }
        });

        console.log('执行完成');
    }
}

genSym();
将生成的 symbols 目录内容压缩为 zip 文件,并放到自定义目录中,如 .electron-symbols/custom,然后上传符号文件至 Sentry,主要代码示例:
const SentryCli = require('@sentry/cli');
const argv = require('yargs').argv;
const path = require('path');
const fs = require('fs');
const zipDir = argv.dir || '.electron-symbols/custom';

async function doUpload() {
  const sentryCli = new SentryCli(argv.test ? './sentry.properties' : './sentry.prod.properties');
  const zipFiles = fs.readdirSync(zipDir).filter(name => name.endsWith('symbols.zip'));

  if (!zipFiles) {
    console.log('未发现可上传的 Symbols 文件!', zipDir);
    return;
  }

  for (const filename of zipFiles) {
      const zipPath = path.resolve(zipDir, filename);
      await sentryCli.execute(['upload-dif', '-t', 'breakpad', '--no-zips', zipPath], true);
  }
}

doUpload();
执行测试一下,若一切顺利则效果大致如下:
相关参考:
- https://docs.sentry.io/platforms/native/data-management/debug-files/upload/
4. 相关问题与解决
4.1 Electron 编译默认输出的 Release 版本 pdb 文件过大
使用默认参数配置编译输出 Release 版本的目录中,electron.exe.pdb 文件大小接近 1.5G至2G之间。这是因为默认编译输出的符号文件中包含了源码等比较多的信息,可以通过设置编译参数 symbol_level=1 调整符号文件的输出。该参数可以添加在配置文件中:
electron/build/args/release.gn
也可以添加在生成 GN 工程的命令行中:
gn gen out/Release --args="import(\"//electron/build/args/release.gn\") symbol_level=1"
设置了 symbol_level=1 后输出的 electron.exe.pdb 大小就只有一百多 M 了。
4.2 使用 dump_syms.exe 生成 sym 文件失败
报错信息如下:
CoCreateInstance CLSID_DiaSource {E6756135-1E65-4D17-8576-610761398C3C} failed (msdia*.dll unregistered?)
Open failed
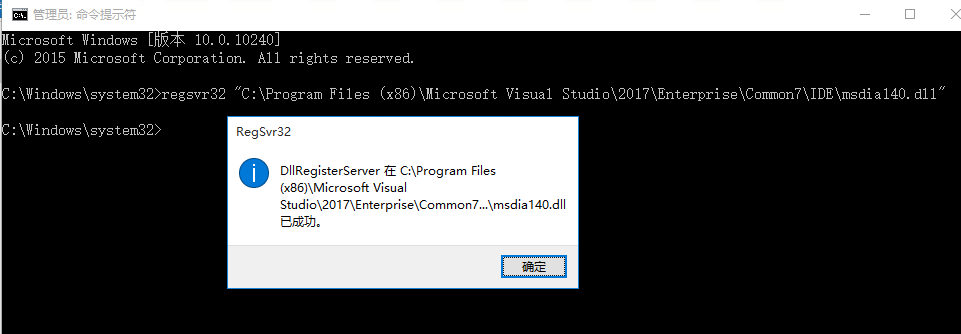
此为系统未注册 msdia*.dll 文件。从 Visual Studio 的安装目录中可以搜索到,在目录 C:\Program Files (x86)\Microsoft Visual Studio\2017\Enterprise\Common7\IDE\ 下存在 msdia120.dll 和 msdia140.dll 文件。我们注册一下 msdia140.dll 即可。
使用系统管理员方式启动 cmd 命令提示符(快捷键win+x,点击“命令提示符(管理员)"),然后执行如下命令注册 msdia140.dll:
regsvr32 "C:\Program Files (x86)\Microsoft Visual Studio\2017\Enterprise\Common7\IDE\msdia140.dll"
如果使用的是非系统管理员 cmd 执行,则会得到 0x80070005 错误码的注册失败提示:
msdia140.dll 已加载,但对 DllRegisterServer 的调用失败,错误代码为 0x80070005
5 .相关参考
- https://www.electronjs.org/docs/development/debug-instructions-windows#debugging-on-windows
- https://www.electronjs.org/docs/development/setting-up-symbol-server
- https://docs.microsoft.com/zh-cn/windows-hardware/drivers/debugger/debugger-download-tools
- https://docs.microsoft.com/zh-cn/windows-hardware/drivers/debugger/getting-started-with-windbg
- https://docs.sentry.io/platforms/native/data-management/debug-files/
- https://docs.sentry.io/platforms/native/guides/breakpad/data-management/debug-files/file-formats/
- https://docs.sentry.io/product/cli/dif/
- Sentry命令行工具之PDB文件上传
- Sentry-cli: 监控 electron crash 的最后一步
- How to create breakpad symbols #9
- https://help.backtrace.io/en/articles/1674585-symbolification
- LSP异常导致Electron启动不了问题分析
- simple-breakpad-server在线解析dump原理及具体操作
- Google Breakpad 学习笔记
- https://github.com/nornagon/electron-minidump
- https://www.npmjs.com/package/minidump
- https://github.com/acrisci/simple-breakpad-server
- https://github.com/electron/chromium-breakpad/blob/master/dump_syms.exe


😥 😥 😥 😥
您好,可否就关于解析electron崩溃产生的.dmp文件有偿咨询您?我不知道如何把dmp文件最终和源代码关联起来。用sentry有网络问题,能否纯自己操作?我用visual studio,卡在了自己的代码的pdb文件无法生成,搜不到方法。如果您知道如何做,万分感谢。我的微信452077574
[…] 如果因为一些特别的需求,有针对 Electron 源码进行了改动并自编译,其接入 Sentry 的方法可参考如下文章: Electron 自编译应用崩溃(crash)调试分析方法 […]